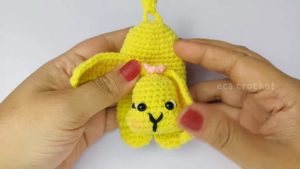
Tiny yet delightful, the Crochet Mini Chicken Keychain Pattern is both adorable and easy to create. This cute chicken fits perfectly in your palm and features detailed elements like a bright red comb and shining 4mm plastic eyes. Round by round, you’ll watch this charming chicken take shape as you stitch the body and add stuffing. Ideal for gifts or craft markets, this little keychain brings a touch of handmade charm wherever it goes, making it a must-try for crochet enthusiasts.

Why Love This Pattern?
- Simplicity: The pattern appears to be straightforward, making it accessible even if you are not yet an expert at other patterns.
- Quick to Make: The creator mentions that this is a quick project, which is perfect for those who want to create something in a short amount of time.
- Great for Gifts or Markets: The finished mini chickens are suggested to be ideal for selling at crochet markets or gifting, adding a personal touch to your creations.
- Customizable Details: With options for adding safety eyes and customizing the comb and mouth, there's room to add your personal flair.
- Structured Process: The clearly outlined rounds and steps provide a structured crocheting experience, ensuring that you can easily keep track of your progress.
How To Crochet Mini Chicken Keychain
Materials:
- Yarn
- Crochet hook
- Plastic safety eyes (4 mm)
- Yarn needle
- Scissors
- Stuffing
Abbreviations:
- MR: Magic Ring
- ch: Chain
- sc: Single Crochet
- inc: Increase (2 single crochets in one stitch)
- dec: Decrease (combine two stitches into one)

Pattern:
Body:
- Round 1: Start with a Magic Ring, and crochet 8 sc into the ring. (8 sts)
- Round 2: inc in each stitch around. (2 sc in each stitch) (16 sts)
- Round 3: 1 sc, inc repeat around. (24 sts)
- Round 4: 2 sc, inc repeat around. (32 sts)
- Round 5-9: sc in each stitch around. (32 sts per round)
Decreasing Rounds:
- Round 10: 2 sc, dec repeat around. (24 sts)
- Round 11: 1 sc, dec repeat around. (16 sts)

Before closing:
- Add stuffing.
- Insert the plastic eyes between Round 9 and Round 10.
Final Closing:
- Round 12: dec around. (8 sts)
- Finish and sew the hole closed with the tail.

Comb (Top of the chicken's head):
- Start with a slipknot.
- Insert hook into the second hole from the left side.
- ch 2, then make a half double crochet (hdc):
- Yarn over, insert into stitch, yarn over and pull through (3 loops on hook), yarn over and pull through all 3 loops.
- ch 2, slip stitch in the same stitch.
- Repeat the process:
- ch 2, hdc in next stitch, ch 2, slip stitch in the same stitch.
- Cut the yarn and weave in the end.

Finishing:
- If you haven’t placed the eyes yet, insert them now.
- Make the mouth using yarn and a yarn needle.
- Weave in all ends and secure the finishing touches.
That’s it! Your mini crochet chicken is done.

Tips:
- Ensure your stitches are tight to keep the stuffing from showing.
- Adjust the positioning of the safety eyes after completing the main body if necessary.
- Use contrasting yarn colors for the comb and beak to make the chicken more colorful and appealing.
I hope this helps you in creating your mini crochet chicken! Enjoy your crafting!


Leave a Reply